21.04.2025 - 12.05.2025 / Week 1- Week 4
Angelique Svetlana Pekasa / 0377365
Video & Sound Production / Bachelors Of Creative Media / Taylor's University
Task 1: Exercise 1
Table of contents
Lectures
Week 1 Asynchronous Study:
Types of Shot Sizes:
 Fig 1.1, shot sizes, ( week 1, 24/04/2024)
- Extreme Wide Shot: This establishes the location, it focus onto building the place of the scene where the main character or subject is wither very small or simply not visible at all.
- Wide Shot (WS)/Long Shot (LS): Subject is shown from head to toe in order to also tell the environment of the scene.
- Full Shot: Subject is shown from head to toe tighter than wide shot.
- Medium Wide Shot (MWS): Subject is frames from above the knees
- Medium Shot (MS): Frames subject from waist up, it is mostly shot for dialogues.
- Medium Close-Up (MCU): Frames the subject from chest up, this emphasizes the subject's emotion and reaction.
- Close-Up (CU): Frames the subject’s face strictly, this highlights the subject's emotion and detail even more.
- Extreme Close-Up (ECU): Frames the detailed features of part of the face (or any object/scene) (for example eyes).
Types of framing:
 Fig 1.2, shot sizes, ( week 1, 24/04/2024)
- Single Shot: Emphasize one character in a frame.
- Two-Shot: Two characters are shown in a frame which tells viewer of their relationship.
- Over-the-Shoulder (OTS) Shot: A character is shown in the frame from behind another character's shoulder, this is usually used in conversations.
- Over-the-Hip (OTH): A character is shown in the frame from below another character's hip, this shows power imbalance.
- Point of View (POV) Shot: The frames shows what the character is looking at, as if we are the character in it.
- Insert Shot: Focuses on a specific object in the scene.
Types of Camera Angle:
 Fig 1.3, shot sizes, ( week 1, 24/04/2024)
- Eye-Level: The camera is place on the eye-level to gain Neutral perspective and make it seems balanced.
- High Angle: Camera is placed on top, looking down towards subject in order for the subject to appear vulnerable or weak.
- Low Angle: Camera is placed on the bottom, looking up towards the subject in order for the subject to appear powerful.
- Overhead/Bird’s Eye View: Camera is placed directly overhead, creating distortion, abstraction or vulnerability.
- Dutch Angle (Tilted Shot): Camera have a slanted horizon, creating uneasiness and a sense of disorientation.
- Worm’s Eye View: Camera is placed at an extremely low angle looking straight up, this leads to distortion which emphasizes scale or power.
Types of compositions:- Rule of Thirds: Frame is divided into 3 equal parts both horizontally and vertically, the subject will be place at the intersection which creates balance and interest.
- Leading Lines: Using imaginary lines or actual lines (example: roads, walls) in order to guide the viewer’s eye to the subject.
- Symmetry and Balance: A symmetrical shots made to feel harmonious and balance, however it could also be use to create tension depending on the situation.
- Depth: Using foreground, middle ground, and background layering in order to add dimension.
- Headroom and Lead Room: Head room: Space above the subject's head; Lead room: Extra space provided when the subject is moving towards a direction.
- Framing Within Frames: Using objects (ex. windows and doors) in order to create visual frames.
- Patterns and Textures: Patterns could be repeated to create pleasure and broken to create emphasis, Texture could create interest.
Quiz results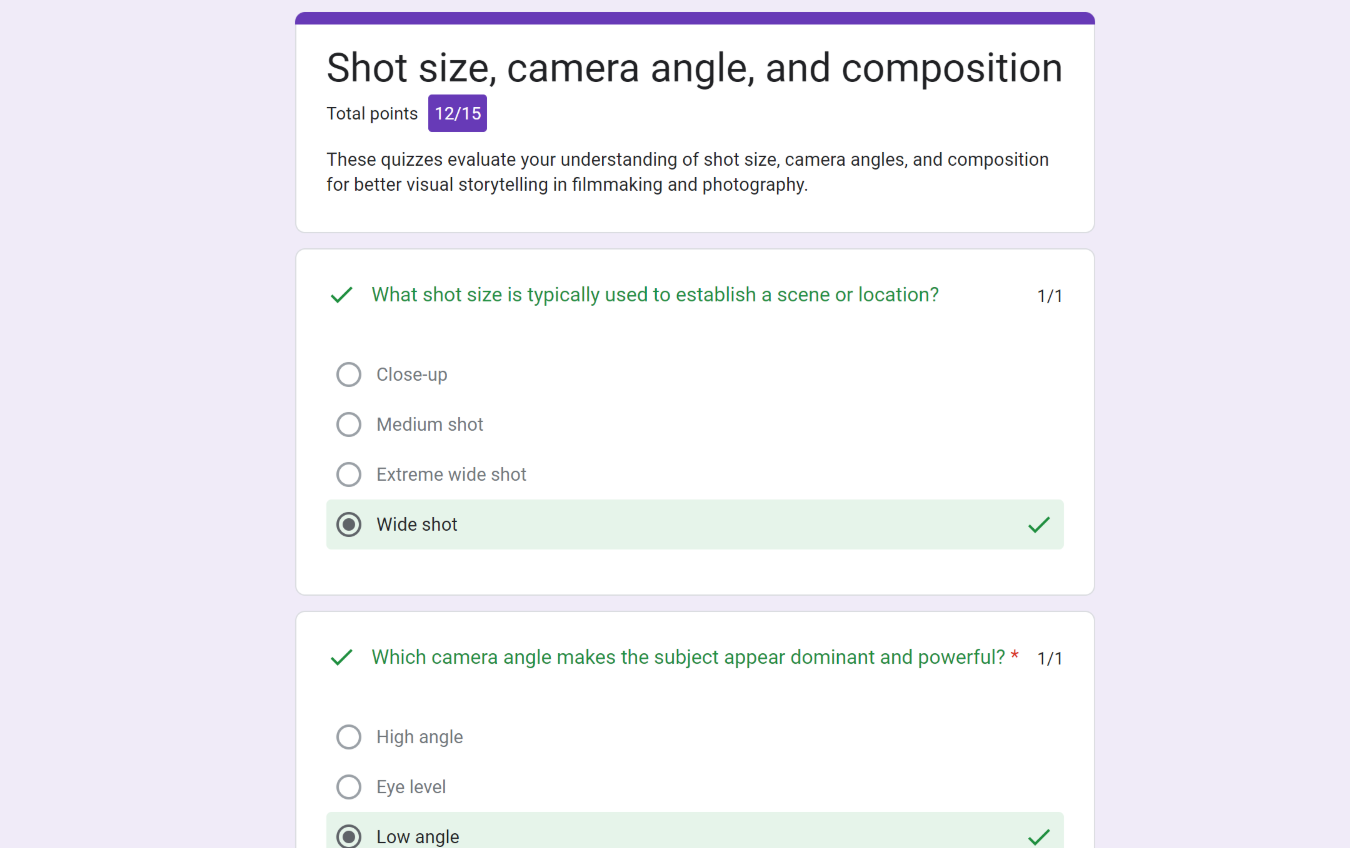 Fig 1.4, quiz results, ( week 1, 24/04/2024)
Week 2 Asynchronous Study:
The three act story structure is a narrative framework that divides the narrative into 3 acts:
 Fig 1.5, 3 act story, ( week 2, 03/05/2024)
- Act one (Set up): This act is basically the beginning (the hook), it introduces the audiences to the characters, and their settings. At this stage there will be an "Inciting incident" which will jump start the story.
- Act two (Confrontation/ Buildup): This act is where the conflict started, where the protagonist faces a challenge that starts to builds up. Contains Midpoint where it changes the events of the story.
- Act three (Resolution): This act is where the climax happens, where the conflict is confronted and resolved. This contains resolution, a conclusion to the narrative.
Quiz result Fig 1.6, quiz results, ( week 2, 03/05/2024)
After doing the quiz and reading/watching the links given, we were task to answer 5 questions based on the short film Lanin and Everything, Everywhere, All at once.
Lanin 1. Which part is act 1, act 2, act 3 respectively?
Act 1: The story introduces Lanin, a girl with acne-prone skin who gets bullied by her peers. The bullying effects her so much that she becomes insecure of it, and in order to gain a fresh start she moves to Japan and become a popular net idol where she uses photo editing and beauty filters to hide her true self and become flawless. But in her daily life, she will always hide her face under a mask.
Act 2: Because of her online fame, she met a guy named, Nuts, online and their relationship grew through online chatting. Suddenly Nuts went to Japan to meet Lanin
Act 3: Lanin avoid meeting Nuts as she is afraid of showing her true face. After Nuts left, Lanin discovers that she they have known each other long ago and they shared a similar story. Because of this Lanin confronts her fear and searched for Nuts who already left. At the end they didn't find each other, but Lanin faced her fear, removed her mask, and accept her true self.
2. What is the inciting incident in the movie?
The inciting incident is where Lanin moves to Japan and makes a new online identity for herself that hides her true face under beauty filters.
3. What is the midpoint scene in the movie?
The midpoint of the movie is where Lanin gets to know Nuts, they both forms a genuine connection with each other and Nuts decided to go to Japan in order to meet Lanin.
4. What is the Climax scene in the movie?
The climax of the movie was when Lanin realized that she and Nuts knew each other from long ago, and they both shared a similar story. Because of that Lanin decided to change her mind, accept herself, and chase for Nuts who already left.
5.What is the theme of the movie?
The theme of the movie is self-acceptance. Lanin is very insecure of her acne-prone face that she hides it in her daily life with a mask, and also hides it in her online life behind beauty filters and edits. The movie highlights how we should accept ourselves alongside our imperfections.
Everything, Everywhere. All at once
1. Which part is act 1, act 2, act 3 respectively?
Act 1: The story introduces Evelyn, her family, and her current situation where she is running a laundry matt, in the verge of a divorce, with a debt, and a tough relationship with her daughter. When going to IRS audit she met an alternate version of her husband who claims to be from a different universe and introduce her to verse jumping.
Act 2: The antagonist of the movie was introduced, who turns out to be her own daughter, Joy. They fought in the IRS building and Evelyn began to explore verse jumping into alternate versions of herself. Joy's idea of nothing matters influences Evelyn's way of thinking.
Act 3: Evelyn realizes that things actually matter as she saw her husband fight for her in every universe. And in every universe she tries to fight back and make things right by choosing kindness over chaos.
2. What is the inciting incident in the movie?
When her husband from another universe goes to Evelyn and told her about verse jumping, and how all universe is in the verge of dying, and she is the only one who could save it.
3. What is the midpoint scene in the movie?
The midpoint is where Evelyn met Joy, and Joy explains about how everything doesn't matter and it began to influence how Evelyn thinks.
4. What is the Climax scene in the movie?
The climax of the scene is when Evelyn chooses kindness and restores her relationship with Joy. She does this in every universe, and this changes Joy's perspective as in every universe, although in chaos life is worth living.
5.What is the theme of the movie?
The theme of the movie is finding the search of meaning in life. This movie deals a lot with the idea of nihilism, and this movie tells us that life actually matters because of the relationship that we have. And although in chaos, life is worth living.
Week 3 Asynchronous Study:
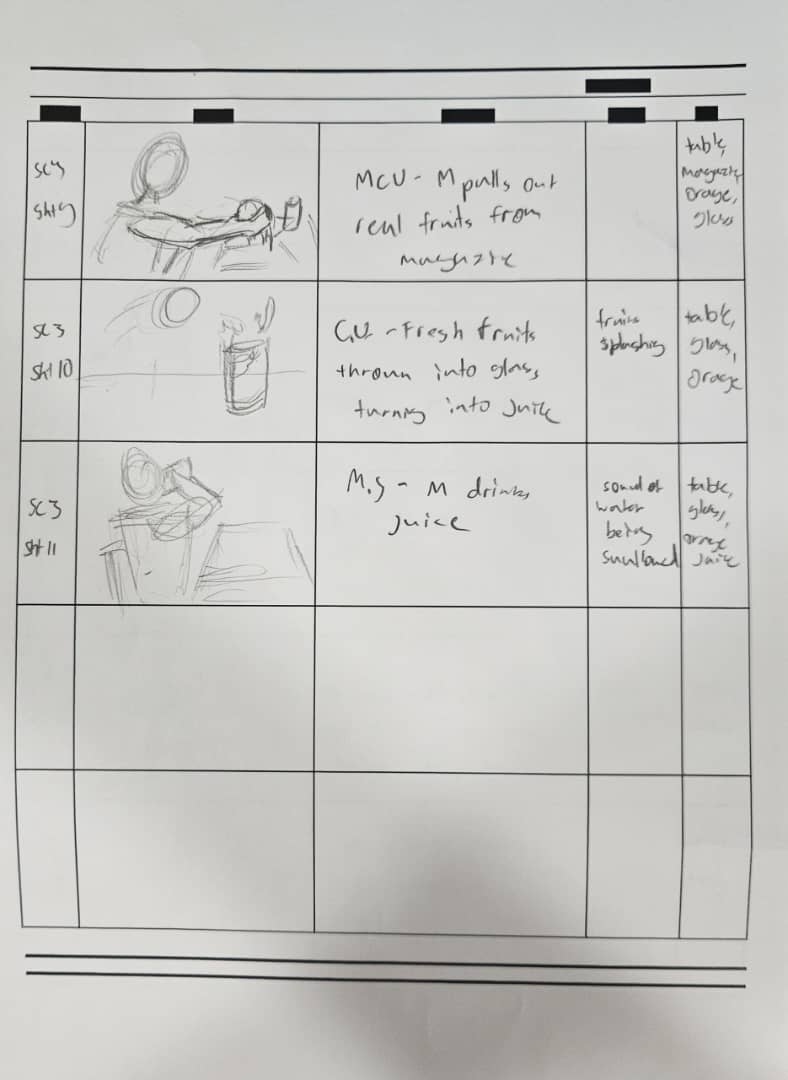
Storyboard is a visual breakdown of individual sequence of a scene within a movie, a storyboard could include dialogues, composition, camera angle, or character movement.
 Fig 1.7, Storyboard, ( week 3, 08/05/2024)
How to create a storyboard:- Identify key Scenes: Breakdown the key beats or plot points. For example location and character.
- Map out scenes: Divide major parts into columns and organize it by naming each one of them.
- Add image/sketches: Add image, reference, or draw the scene out.
- Describe what happen in each frame: Dialogues, camera angle, compositions could be written down or sketched further to increase understanding of the scene.
- Share it with team: Review the storyboard together, use the feedback gained.
- Reference it: Print it out and share it to make it as a reference.
Quiz results Fig 1.7, Quiz results, ( week 3, 08/05/2024)
Week 4 Asynchronous Study:
There are 5 stages of film production:- Development: This is the beginning or the initial stage, where the producer have an idea. At this stage the producer will put together the package, which refers to collection of creative elements that will be a part of the project, for example, screenplay or the list of actors. Financing also happens at this stage, studios can get money from presales, investors, or take out loans.
- Pre-Production: This refers to the preparation necessary before filming, which include budgeting, getting the team together (hiring the crew), and pre-visualizing (making a storyboard and writing a short-list).
- Production: This is where the actual film-making takes place. At this stage there will be a call sheet, a document containing the call times and what will they do during the day. This is also where "the set up" happens, where all cameras and lightning are set up to do the shoot, and makeup and costume department prepare their actors. After that shooting will happen.
- Post-Production: After all footages are captured, they are then edited at this stage. This is where picture editing, sound editing, and lastly additional visuals are edited. Additional visuals refers to CGIs or VFX that is needed.
- Distribution: After everything is done, the movie are then marketed and distributed. In order to secure distribution, studios might need to to have a distribution company or if you're an individual film maker you might need to distribute it at a film festival.
Quiz results
 Fig 1.8, Quiz results, ( week 4, 15/05/2024)
It takes a team to make a movie, each of them have their own roles and responsibilities. Shown below are the main parts of the production crew:

- Extreme Wide Shot: This establishes the location, it focus onto building the place of the scene where the main character or subject is wither very small or simply not visible at all.
- Wide Shot (WS)/Long Shot (LS): Subject is shown from head to toe in order to also tell the environment of the scene.
- Full Shot: Subject is shown from head to toe tighter than wide shot.
- Medium Wide Shot (MWS): Subject is frames from above the knees
- Medium Shot (MS): Frames subject from waist up, it is mostly shot for dialogues.
- Medium Close-Up (MCU): Frames the subject from chest up, this emphasizes the subject's emotion and reaction.
- Close-Up (CU): Frames the subject’s face strictly, this highlights the subject's emotion and detail even more.
- Extreme Close-Up (ECU): Frames the detailed features of part of the face (or any object/scene) (for example eyes).
- Single Shot: Emphasize one character in a frame.
- Two-Shot: Two characters are shown in a frame which tells viewer of their relationship.
- Over-the-Shoulder (OTS) Shot: A character is shown in the frame from behind another character's shoulder, this is usually used in conversations.
- Over-the-Hip (OTH): A character is shown in the frame from below another character's hip, this shows power imbalance.
- Point of View (POV) Shot: The frames shows what the character is looking at, as if we are the character in it.
- Insert Shot: Focuses on a specific object in the scene.
- Eye-Level: The camera is place on the eye-level to gain Neutral perspective and make it seems balanced.
- High Angle: Camera is placed on top, looking down towards subject in order for the subject to appear vulnerable or weak.
- Low Angle: Camera is placed on the bottom, looking up towards the subject in order for the subject to appear powerful.
- Overhead/Bird’s Eye View: Camera is placed directly overhead, creating distortion, abstraction or vulnerability.
- Dutch Angle (Tilted Shot): Camera have a slanted horizon, creating uneasiness and a sense of disorientation.
- Worm’s Eye View: Camera is placed at an extremely low angle looking straight up, this leads to distortion which emphasizes scale or power.
- Rule of Thirds: Frame is divided into 3 equal parts both horizontally and vertically, the subject will be place at the intersection which creates balance and interest.
- Leading Lines: Using imaginary lines or actual lines (example: roads, walls) in order to guide the viewer’s eye to the subject.
- Symmetry and Balance: A symmetrical shots made to feel harmonious and balance, however it could also be use to create tension depending on the situation.
- Depth: Using foreground, middle ground, and background layering in order to add dimension.
- Headroom and Lead Room: Head room: Space above the subject's head; Lead room: Extra space provided when the subject is moving towards a direction.
- Framing Within Frames: Using objects (ex. windows and doors) in order to create visual frames.
- Patterns and Textures: Patterns could be repeated to create pleasure and broken to create emphasis, Texture could create interest.

- Act one (Set up): This act is basically the beginning (the hook), it introduces the audiences to the characters, and their settings. At this stage there will be an "Inciting incident" which will jump start the story.
- Act two (Confrontation/ Buildup): This act is where the conflict started, where the protagonist faces a challenge that starts to builds up. Contains Midpoint where it changes the events of the story.
- Act three (Resolution): This act is where the climax happens, where the conflict is confronted and resolved. This contains resolution, a conclusion to the narrative.

After doing the quiz and reading/watching the links given, we were task to answer 5 questions based on the short film Lanin and Everything, Everywhere, All at once.
1. Which part is act 1, act 2, act 3 respectively?
Act 1: The story introduces Lanin, a girl with acne-prone skin who gets bullied by her peers. The bullying effects her so much that she becomes insecure of it, and in order to gain a fresh start she moves to Japan and become a popular net idol where she uses photo editing and beauty filters to hide her true self and become flawless. But in her daily life, she will always hide her face under a mask.
Act 2: Because of her online fame, she met a guy named, Nuts, online and their relationship grew through online chatting. Suddenly Nuts went to Japan to meet Lanin
Act 3: Lanin avoid meeting Nuts as she is afraid of showing her true face. After Nuts left, Lanin discovers that she they have known each other long ago and they shared a similar story. Because of this Lanin confronts her fear and searched for Nuts who already left. At the end they didn't find each other, but Lanin faced her fear, removed her mask, and accept her true self.
2. What is the inciting incident in the movie?
The inciting incident is where Lanin moves to Japan and makes a new online identity for herself that hides her true face under beauty filters.
3. What is the midpoint scene in the movie?
The midpoint of the movie is where Lanin gets to know Nuts, they both forms a genuine connection with each other and Nuts decided to go to Japan in order to meet Lanin.
4. What is the Climax scene in the movie?
The climax of the movie was when Lanin realized that she and Nuts knew each other from long ago, and they both shared a similar story. Because of that Lanin decided to change her mind, accept herself, and chase for Nuts who already left.
5.What is the theme of the movie?
The theme of the movie is self-acceptance. Lanin is very insecure of her acne-prone face that she hides it in her daily life with a mask, and also hides it in her online life behind beauty filters and edits. The movie highlights how we should accept ourselves alongside our imperfections.
Act 1: The story introduces Evelyn, her family, and her current situation where she is running a laundry matt, in the verge of a divorce, with a debt, and a tough relationship with her daughter. When going to IRS audit she met an alternate version of her husband who claims to be from a different universe and introduce her to verse jumping.
Act 2: The antagonist of the movie was introduced, who turns out to be her own daughter, Joy. They fought in the IRS building and Evelyn began to explore verse jumping into alternate versions of herself. Joy's idea of nothing matters influences Evelyn's way of thinking.
Act 3: Evelyn realizes that things actually matter as she saw her husband fight for her in every universe. And in every universe she tries to fight back and make things right by choosing kindness over chaos.
2. What is the inciting incident in the movie?
When her husband from another universe goes to Evelyn and told her about verse jumping, and how all universe is in the verge of dying, and she is the only one who could save it.
3. What is the midpoint scene in the movie?
The midpoint is where Evelyn met Joy, and Joy explains about how everything doesn't matter and it began to influence how Evelyn thinks.
4. What is the Climax scene in the movie?
The climax of the scene is when Evelyn chooses kindness and restores her relationship with Joy. She does this in every universe, and this changes Joy's perspective as in every universe, although in chaos life is worth living.
5.What is the theme of the movie?
The theme of the movie is finding the search of meaning in life. This movie deals a lot with the idea of nihilism, and this movie tells us that life actually matters because of the relationship that we have. And although in chaos, life is worth living.
- Identify key Scenes: Breakdown the key beats or plot points. For example location and character.
- Map out scenes: Divide major parts into columns and organize it by naming each one of them.
- Add image/sketches: Add image, reference, or draw the scene out.
- Describe what happen in each frame: Dialogues, camera angle, compositions could be written down or sketched further to increase understanding of the scene.
- Share it with team: Review the storyboard together, use the feedback gained.
- Reference it: Print it out and share it to make it as a reference.
- Development: This is the beginning or the initial stage, where the producer have an idea. At this stage the producer will put together the package, which refers to collection of creative elements that will be a part of the project, for example, screenplay or the list of actors. Financing also happens at this stage, studios can get money from presales, investors, or take out loans.
- Pre-Production: This refers to the preparation necessary before filming, which include budgeting, getting the team together (hiring the crew), and pre-visualizing (making a storyboard and writing a short-list).
- Production: This is where the actual film-making takes place. At this stage there will be a call sheet, a document containing the call times and what will they do during the day. This is also where "the set up" happens, where all cameras and lightning are set up to do the shoot, and makeup and costume department prepare their actors. After that shooting will happen.
- Post-Production: After all footages are captured, they are then edited at this stage. This is where picture editing, sound editing, and lastly additional visuals are edited. Additional visuals refers to CGIs or VFX that is needed.
- Distribution: After everything is done, the movie are then marketed and distributed. In order to secure distribution, studios might need to to have a distribution company or if you're an individual film maker you might need to distribute it at a film festival.

- Producer: Is the leader of the whole project, responsible for managing everything from the start of the production to the very end of it. Develops the original idea for the movie
- Director: Responsible for overseeing and assembly of the movie, works with actors and crew.
- Screenwriter: Writes the screenplay and dialogues for the actors, ensures a logical transition from one scene to the next.
- Production Designer: Creates storyboards that acts as the movie's first draft.
- Art Director: Responsible for the film's settings or set, like background location alongside the props used.
- Costume Designer: Designs costume that the actors will where to potray their character and status.
- Cinematographer: Operates the camera, responsible for shooting angles, composition and lightning. Works closely with the director and camera crew.
- Editor: Organize footage, and edit them into one continuous sequence. Adds visual effects if needed.
- Music Supervisor: Search for the right music to be used in a scene, in order to increase the viewer's emotion towards the scene.
- Actors: Responsible for portraying the characters and bring them to reality.
Quiz results Fig 1.8, Quiz results, ( week 4, 15/05/2024)
Week 5 Asynchronous Study:
Mise en scène is a French word that translates to "setting the stage", it is the arrangement of scenery and stage properties, including it's sets, props, actors, costumes, lighting, and composition. It's the visual storytelling that conveys mood, character, and narrative without dialogue
Some of the key elements are:- Set Design & Location: The shot should be made in the right location as it will effect the overall mood of the movie, and also reflects to the story of the movie.
- Costume & Makeup: The wardrobe will reflect the character's personality and background which will bring the character to life.
- Composition: Composition plays a crucial role as it directs the viewer's attention to the important parts of the shot and communicates with the viewers without words.
- Lightning: Lightning sets the entire mood of the scene, including the character's emotions. How bright or dark the scene is will reveal different emotions.
- Color: Color schemes influence the entire movie greatly as different tones represents different moods or emotions.
Quiz results Fig 1.9, Quiz results, ( week 5, 27/05/2024)
Week 6 Asynchronous Study:
Color theory is a science theory used to explain colors hues and saturation, at the same time it's also a creative discipline that tells of how color is used to create the emotions. There are 3 types of color theory:
-Color wheel -Color context
-Color harmony
 Fig 1.10, Color Wheel ( week 6, 03/05/2024)
Color temperature is how warm or cool the light is, it is used to set the mood of the movie.
Color correction is the first step in color editing as it adjust the footage in order to look natural. It is done within 5 steps:
1. Normalizing the footage 2. Fixing saturation 3. fixing brightness and contrast 4. Setting the new color balance 5. Double checking the skin tones
Color grading is the next optional step, color grading is used to set the mood or tone of the narrative and create the aesthetics of the video. Color grading uses LUT, or look up tables, a cheat sheet used to give desired grade and look. Color grading is done within 5 steps.
1. Normalizing the folate 2. Follow the steps to correct the colors 3. Choose the desired look and style 4. Make color adjustments 5. Double checking the skin tones and vectorscope
- Producer: Is the leader of the whole project, responsible for managing everything from the start of the production to the very end of it. Develops the original idea for the movie
- Director: Responsible for overseeing and assembly of the movie, works with actors and crew.
- Screenwriter: Writes the screenplay and dialogues for the actors, ensures a logical transition from one scene to the next.
- Production Designer: Creates storyboards that acts as the movie's first draft.
- Art Director: Responsible for the film's settings or set, like background location alongside the props used.
- Costume Designer: Designs costume that the actors will where to potray their character and status.
- Cinematographer: Operates the camera, responsible for shooting angles, composition and lightning. Works closely with the director and camera crew.
- Editor: Organize footage, and edit them into one continuous sequence. Adds visual effects if needed.
- Music Supervisor: Search for the right music to be used in a scene, in order to increase the viewer's emotion towards the scene.
- Actors: Responsible for portraying the characters and bring them to reality.
- Set Design & Location: The shot should be made in the right location as it will effect the overall mood of the movie, and also reflects to the story of the movie.
- Costume & Makeup: The wardrobe will reflect the character's personality and background which will bring the character to life.
- Composition: Composition plays a crucial role as it directs the viewer's attention to the important parts of the shot and communicates with the viewers without words.
- Lightning: Lightning sets the entire mood of the scene, including the character's emotions. How bright or dark the scene is will reveal different emotions.
- Color: Color schemes influence the entire movie greatly as different tones represents different moods or emotions.
Week 6 Asynchronous Study:
Instructions
Exercises

Shown below in Fig 2.2 is the final work.


Exercise: VFX trial (Week 10)

Comments
Post a Comment